May 08, 2020
how-to: whipped back stitch
whipped back stitch is an outline stitch that creates a smooth and slightly raised line; it is very neat and precise, but not bulky. this stitch is a great choice for stitching lettering and tightly curved lines - just remember to make your foundation stitches small to keep the curves well-defined.
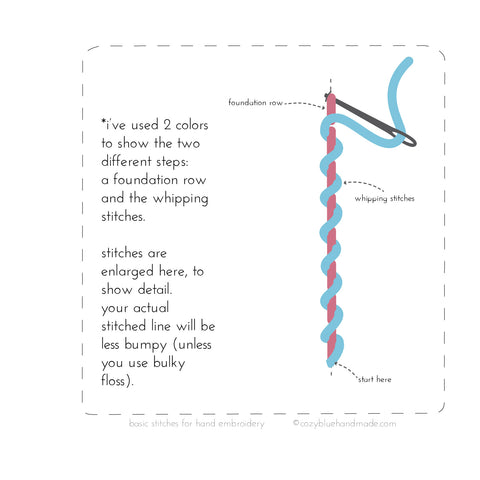
start by making a foundation row of simple back stitches. once you’ve stitched that line, you’re ready to whip it:
bring your needle up at the same point where you started your row of back stitches, and slide the needle under the stitch (do not go through the fabric), then repeat for each stitch, all the way down the row. end by taking your needle down through the fabric at the same point where your foundation row ends.
basically, you’re wrapping your row of back stitch in a spiral of floss.
TIPS:
- be sure to keep all your whipping going in the same direction. if you start whipping right to left, continue with right to left for all of your lines. (it may help to turn your hoop as you whip)
- you can use the same color for both the foundation row and the whipped row, or use 2 colors for two-tone twisty line.

hi sara! i usually use 2 for the foundation stitches and 2 for the whip, but will sometimes go smaller if it’s something really delicate. in that case, i’d use 1 and 1.
if you are noticing bumps, try smoothing your floss after every few stitches (let the needle dangle so the remaining floss will untwist, and then smooth it with your fingers.) i find that it likes to twist up when i’m making the whip stitches, and this can sometimes make the whips look bumpy and uneven.
hope this helps!
liz 💙 on
What do you find to be the best strand number combination for this (meaning like 3 strands for back stitch, 2 strands for whip? Same number for both)? I love this stitch but sometimes struggle because it ends up too bumpy or not looking smooth/connected enough.
Sara on